Showing posts with label tutorial. Show all posts

Thursday, November 4, 2010

A Moxie Fab Tassel Tutorial

Morning! Did you see this POST HERE -----> MOXIE FAB World?
Ready for a SUPER easy tutorial (only 5 steps!) on how to make your very own MOXIE tassel?
Here ya go....
1. Wrap some floss on a piece of cardstock.
2. Gently pull off the floss and tie a knot around the loops.
3. Fold the top loop down.
4. Add a hanging loop (if you want) with the extra floss and then wrap around and tie off. This knot can easily be tucked under.
5. Cut the ends!
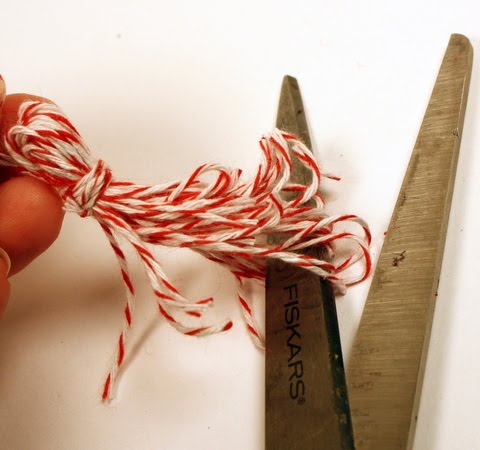
Super easy, right? Be sure to hop on over and check out Moxie Fab World to win a little box of goodies! :)
Happy Thursday!


Wednesday, January 20, 2010

Want to add Some Twirl?

CHECK this OUT HERE.

Thursday, June 18, 2009

Retro Hip Hop: Flash BACKS

Hip Hop! Today, we are doing a retro hop....showing off all those fabulous Unity stamps in our stash that are needing a good inking! :)
I focused on my beloved BACKGROUND stamps. There is so much fun to be had with them. Here is brief sampling of what you can do with background stamps.
Be sure to SEE THE VIDEO over at Unity Place that shows you HOW I made these creations.
Stamps: worn grid, something to say, shurbery tree


Now hop on over to the AMAZING....
***JULIE***

Thursday, June 4, 2009

Unity Stamp Company: 5 Different Gift Card Holders

HIP HOP! Today, the dt members are showing off the fabulous June Kit of the Month: Perfect In Every Way. Be sure to start at the Unity blog so you don't miss any inspiration. :)

This first gift card holder was inspired by the ice cream cone in the kit. I used some of my nestabilities as templates for making the shape. I posted a tutorial for making it HERE.

Stamps: Perfect In Every Way
Paper: Girl Friday pp, PTI cardstock
Ink: antique linen distress ink, memento
Accessories: PTI ribbon, Girl Friday adhesive chipboard, nestabilities, copic markers, sponge, cuttlebug folder

I made an 'x' shape with jute rope to hold the gift card in on this one.

Stamps: Perfect In Every Way
Paper: Early Bird pp, PTI cardstock
Ink: brillance
Accessories: early bird adhesive chipboard, jute rope, copic marker

This is a wallet fold gift card holder. Easy peasy! :)

Stamps: Perfect In Every Way
Paper: PTI cardstock, Chemistry pp
Ink: memento
Accessories: zva adhesive pearl, copic markers, corner rounder, magnetic snap, 1/2" circle punch

Don't you just love this owl? CUTE stuff! :)

Stamps: Perfect In Every Way
Paper: Mr. Campy pp, PTI cardstock
ink: brilliance
Accessories: oval & tag nestabilities, PTI ribbon

This was a super easy pocket gift card.

Stamps: Perfect In Every Way
Paper: Jacks World pp, PTI cardstock
Ink: memento
Accessories: zva rhinestones, copic marker, PTI cardstock

Now HOP ON over to..............

***BROOKE***

Thursday, May 21, 2009

Hip Hopping & Twirling Thursday

Hip Hop! Make sure you start at the Unity blog so you don't miss any of the inspiration! :)
For today's Hip Hop, Unity Stamp Company is honoring our heroes.
Who is your hero?
I had to think about that one. There are a collection of people that I look up to, admire, and strive to emulate but the one person who I look up to the most is my grandmother, GG. Although she lives on the other side of the country, she has been a constant source of unconditional love. :) Here is a picture holding Calvin a few years back. :)


I made a up pop-up card for hip hop today! The pop-up element actually twirls as you open and close it! So fun!!


Of course, I did another video tutorial to help you along if you wanted to give this technique a whirl. :) Be sure to check it out HERE.

*I also wanted to answer a couple chalk cloth questions from last week's Hip Hop project. I bought the chalk cloth precut at a local craft store, Craft Warehouse. I think that you can also buy it by the yard at some fabric stores. If I find an online vendor I will be sure to post it!*

Stamps: You're A Star, Confession: i {luv} unity
Ink: ranger distress ink
Paper: Lil' Man pp, PTI cardstock
Accessories: Michaels ribbon, janome sew mini, prima stars, copic marker, string, stick, buttons

Now HOP on over to..............
***Jennifer***

Friday, October 10, 2008

Easy Halloween Cauldron Tutorial

Here is the tutorial for the cauldron, as promised! The boys are off from school today so we are all being a bit slow. It is a cold Fall morning....think that we will need to start some fires in the fireplace soon! :-) More Haunted stuff later today and then through the weekend!

1. Start with a card base (4.25 x 5.5) that has the score/fold along the top. You will also need a circle template. I used the largest circle from my nestabilitie die-cuts but any circle will work.
2. Trace the circle, leaving about 1/4" hanging over the top of the card.
3. Add triangles to each side for the handles by making a line from the circle to the card edge.
4. Freehand a two legs of the pot.
5. Cut out the shape.
6. I used a corner rounder to round the edges a little.
7. If you want, add a pocket by cutting along the scored edge.
8. I used a strip of paper from the front of my Haunted paper pack. It was the perfect size for my pocket. The paper needs to be aprox. 3 x 2".
9. I didn't want the little tag to hang through the cauldron so I made a zigzag edge along the top for it rest on the cauldron. I took a 1 x 2" strip of paper and my star punch to make it, although you could easily just free hand it.....can you tell that I am lazy?? ;-)
10. I adhered the strip and round the corner.
11. Stamp and embellish!!


Monday, October 6, 2008

Witch Hat Card Tutorial

This hat was super quick, my favorite kind of card!
1. Start with a 5 1/2" x 4 1/4" card base.

2. Mark, with a pencil, 2.5" along the bottom of the card.


3. Use this mark and line it up with the upper right hand corner of the card to make an angle.


4. Cut along this angle so that you will have taken off a triangle on the lower right hand corner of the card base.


5. Now you are going to cut off the other bottom corner. Line up the two corners. BE SURE that you are NOT cutting the scored edge of the card!!


6. You will end up with a triangle. The scored edge is on the left hand side of the card.


7. Cut a 7 x 1" strip of paper.


8. Using a TEMPORARY adhesive, attach it along the bottom of the card. It will extend beyond the triangle a little (aprox. 1/4"). This is fine....the card will still stand up.


9. Trim one side, cutting up at a slight angle.


10. Remove the strip and gentle hold it in half.


11. Follow the cut so that each side is identical.


12. Unfold and now permanently adhere the strip to the bottom of the triangle.


13. Decorate!

Tuesday, September 23, 2008

Friday, September 5, 2008

Flower Pot Pocket Card Tutorial

The flower pot card from yesterday is SO easy! Do you remember making those little drinking cups in school? Same thing!

1. Start out with a square. I chose a 8 1/2" square. I recommend designer paper or a lighter weight card stock, otherwise the folds will get a bit tricky by the end.


2. Score (DON'T CUT!!) from one tip of the square to the other.


3. Fold along your score line to make a large triangle.


4. Take one of the lower points of the triangle and fold it across the card and adhere. I recommend sticky strip but any strong, quick drying adhesive should work.


5. Grab the other corner and bring it in. Adhere.

6. Fold the top triangle down and adhere.


7. Turn it over and fold the other triangle down and adhere.


8. You created a pocket card! Fill it and embellish!

Let me know if you have any questions.


Did you check this out yet? Unified Freebie Friday!!